Crossfading Objects
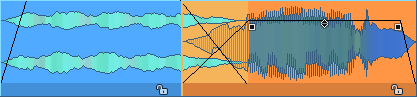
Only one object can be played in a track at a time. When one object is moved over another, it covers the one preceding it in time. The covered part of an object is not played. If you move the rear object back again, the invisible part of the front object can be made visible again and thus audible.
However, it is possible to crossfade two overlapping objects.
Auto Crossfade Mode
|
|
The auto crossfade mode is activated with this button on the upper toolbar or with Auto-Crossfade active in the menu Edit > Crossfade. |

If Auto-Crossfade is active, all objects created by cuts (copy/paste of ranges or objects, split objects or trim) or by recording automatically receive a fade at the object start and at the object end or a crossfade.
Optionally, fades can also be applied to objects created by loading audio files, see the Create fades for new objects when auto-crossfade mode is active option in the Program Preferences > Program > General.
Also, a crossfade is automatically created as soon as an object is moved over another object. Any possible fade-out on the front objects is hereby lost. If the trailing object has a fade-in, a crossfade shorter than or equal to the length of this fade-in is created, depending on the duration of the overlap; without a fade-in, the default crossfade is applied.

Editing objects with the handles in the arrangement changes slightly: the fade-out of the front object and fade-in of the back object are moved together when you change object start or object position of the back object. The fade-in handle of the rear object controls the length of the crossfade and thus also the fade-out length of the front object.
The default crossfade settings used with Auto-crossfade are stored in the Crossfade Editor preset Default_CrossFade and can be customized in the Crossfade Editor.
Crossfades can be edited in great detail with the
Creating Crossfades Manually
Sometimes it is not desired that a crossfade is created when moving objects over each other and that the fade-out and fade-in of the objects are coupled. In this case, disable the Auto-Crossfade option.
To manually create a crossfade between two objects, right-click the fade-in handle of the trailing object and choose Crossfade active from the context menu. You can also find the option as Allow crossfade (to the left) in the menu Edit > Crossfade and in the context menu of objects.
You can also remove a crossfade with auto crossfade mode active by right-clicking a crossfade and deselecting Crossfade active in the context menu.
Asymmetric Crossfades
The standard crossfade is symmetrical, which means that length, curve shape and position of the fade in the object (overlap) are coupled for fade-out and fade-in. Right-click the fade-in handle of the rear object and select Asymmetric Crossfade from the context menu to set fade-in and fade-out separately. You can also find the option in the menu Edit > Crossfade and in the context menu of objects.